【Flutter】スマホの位置情報を取得してみよう

目次
こんにちは。スカイアーチHRソリューションズのきむです。
今回はFlutterで作成したモバイルアプリでスマホの位置情報を取得する方法をご紹介します。
環境
今回使用する環境は下記のとおりです。
Dart:3.3.3
Flutter:3.19.5
Android Studio:Iguana | 2023.2.1
Xcode:15.3
プロジェクトの作成
Flutterのプロジェクトを作成していきます。
今回のプロジェクト名はsample_location_appとします。
flutter create sample_location_app最終的なlibフォルダの中身は下記の通りとなります。
lib
 |  import.dart
 │  main.dart
 ├─utils
 │  get_location.dart
 │  location_permission_request.dart
 │  utils.dart
 └─views
    home.dart
    views.dart
各ファイルでのインポートの記述を簡潔化するためにBarrel File(import.dart)をlibフォルダ直下に作成します。
export 'utils/utils.dart';
export 'views/views.dart';
パッケージインストール
位置情報の取得にはlocationパッケージを使用します。

アプリから端末の位置情報を取得するためには、位置情報の利用権限リクエストが必要です。
権限のリクエストにはpermission_handlerパッケージを使用します。
locationパッケージでも権限のリクエストは可能ですが、permission_handelerの方が柔軟に権限リクエストを行えるためこちらを採用します。
各パッケージのバージョンは本記事の執筆時点で最新のものを使用します。
location:6.0.1
premission_handler:11.3.1
flutter pub add location permission_handlerクラスの作成
位置情報の利用権限リクエストを行うクラスと位置情報を取得するクラスをutilsフォルダ直下に作成します。
位置情報リクエストクラス
import 'package:location/location.dart' hide PermissionStatus;
import 'package:permission_handler/permission_handler.dart';

class RequestLocationPermission {
  static Future<PermissionStatus> request(Location location) async {
    bool serviceEnabled;
    PermissionStatus permissionGranted;

    // 位置情報サービスのステータス確認
    serviceEnabled = await location.serviceEnabled();
    if (!serviceEnabled) {
      serviceEnabled = await location.requestService(); // 許可されていない場合はリクエストを行う
      if (!serviceEnabled) return PermissionStatus.denied;
    }

    // アプリに対しての位置情報権限の利用ステータスを確認
    permissionGranted = await Permission.locationWhenInUse.status;

    if (permissionGranted != PermissionStatus.granted) {
      await Permission.locationWhenInUse.request(); // 許可されていない場合はリクエストを行う
    }

    return permissionGranted;
  }
}
位置情報取得クラス
import 'package:location/location.dart';

class GetLocation {
  static Future<LocationData> getPosition(Location location) async {
    final currentLocation = await location.getLocation();

    print('Date:${DateTime.now()}\nLocation:$currentLocation');

    return currentLocation;
  }
}
作成したクラスはBarrel Fileでエクスポートするためにutils.dartにexport文を記述します。
export 'get_location.dart';
export 'location_permission_request.dart';
画面の作成
今回作成する画面イメージは下記です
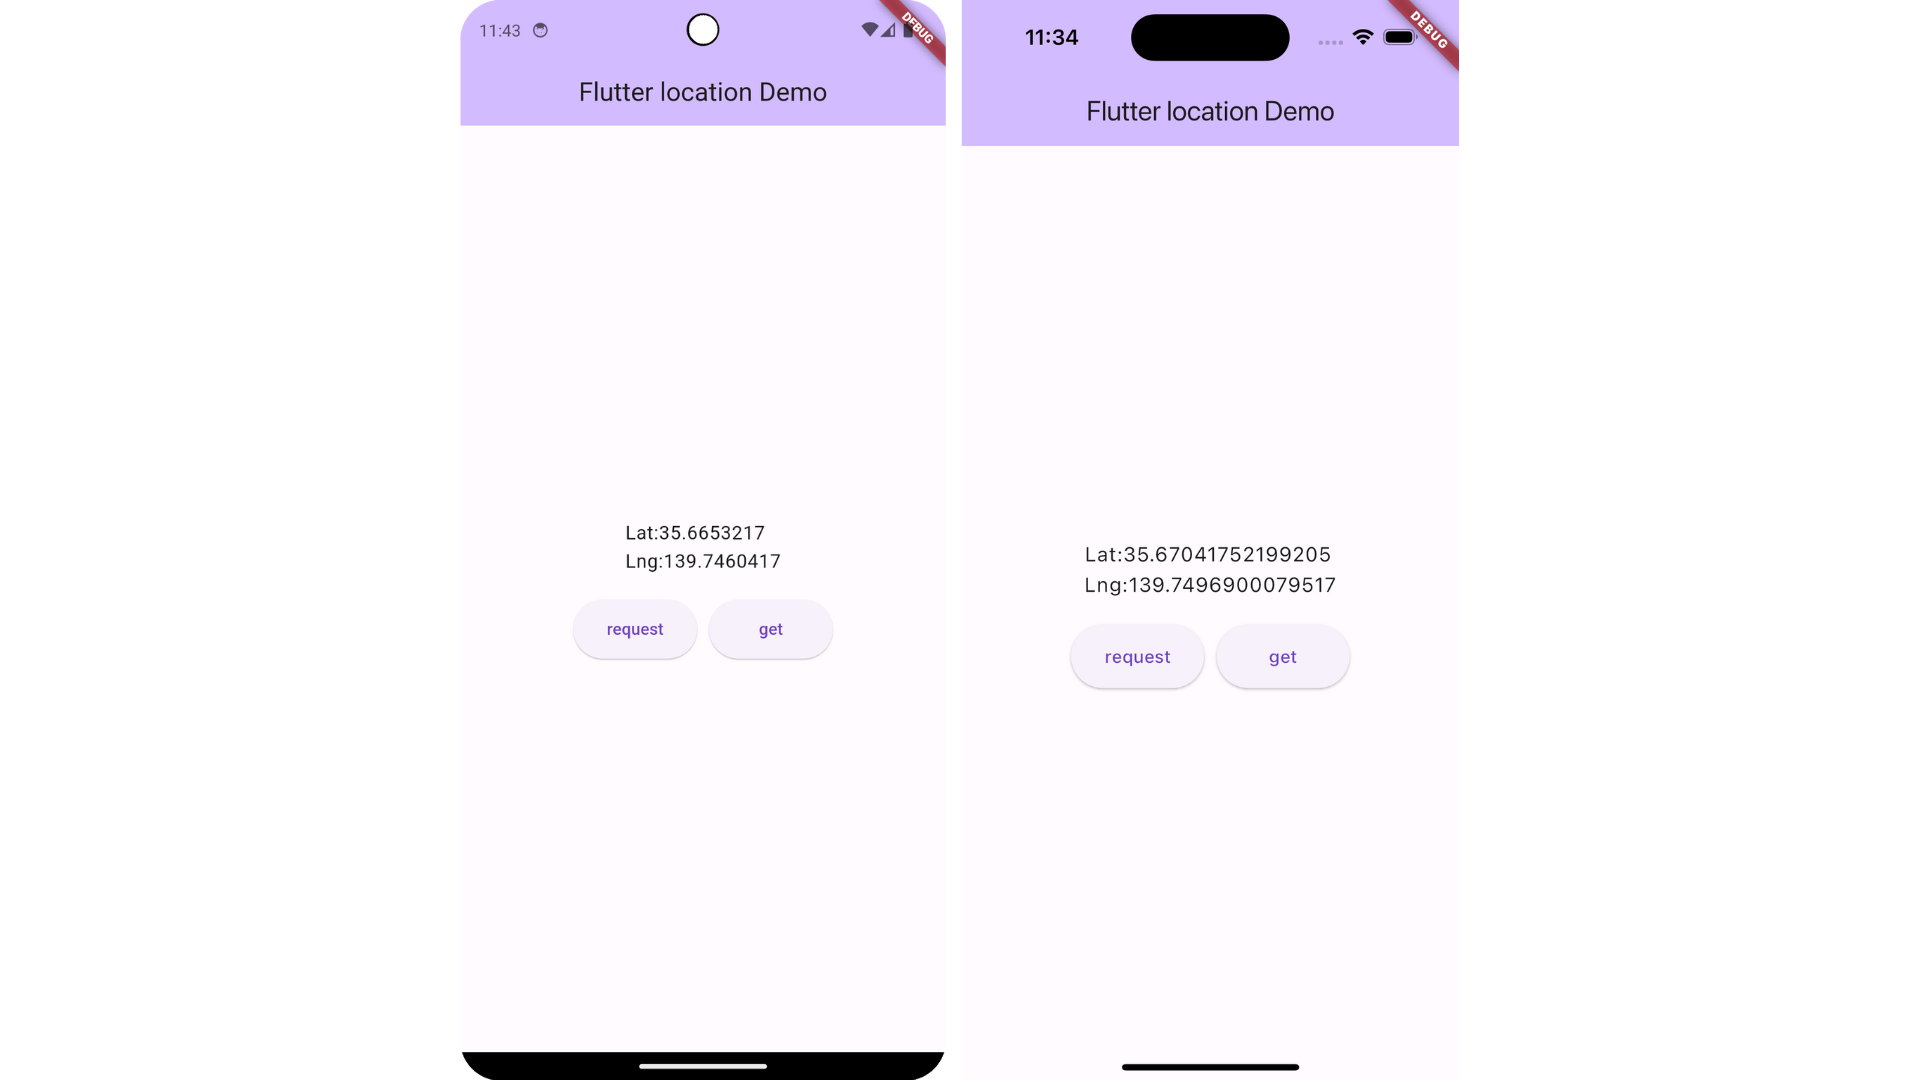
位置情報のリクエストを行うボタンと位置情報を取得するボタンを配置します。
取得した位置情報は画面上に描画されます。
画面のソースコードはviewsフォルダ直下にhome.dartを作成して記述していきます。
import 'package:flutter/material.dart';
import 'package:location/location.dart';
import 'package:sample_location_app/import.dart';

class HomeView extends StatefulWidget {
  const HomeView({super.key, required this.title});

  final String title;

  @override
  State<HomeView> createState() => _HomeViewState();
}

class _HomeViewState extends State<HomeView> {
  LocationData? _currentLocation;
  final location = Location();

  void _requestLocationPermission() async {
    await RequestLocationPermission.request(location);
  }

  void _getLocation() {
    GetLocation.getPosition(location)
        .then((value) => setState(() => _currentLocation = value));
  }

  @override
  Widget build(BuildContext context) {
    return Scaffold(
      appBar: AppBar(
        backgroundColor: Theme.of(context).colorScheme.inversePrimary,
        title: Text(widget.title),
        centerTitle: true,
      ),
      body: Center(
        child: Column(
          mainAxisAlignment: MainAxisAlignment.center,
          children: <Widget>[
            Padding(
              padding: const EdgeInsets.all(10),
              child: Text(
                '$_currentLocation',
                style: Theme.of(context).textTheme.bodyLarge,
              ),
            ),
            ButtonBar(
              alignment: MainAxisAlignment.center,
              buttonPadding: const EdgeInsets.all(10),
              children: [
                SizedBox(
                  height: 50,
                  width: 105,
                  child: ElevatedButton(
                    onPressed: _requestLocationPermission,
                    child: const Text('request'),
                  ),
                ),
                SizedBox(
                  height: 50,
                  width: 105,
                  child: ElevatedButton(
                    onPressed: _getLocation,
                    child: const Text('get'),
                  ),
                ),
              ],
            ),
          ],
        ),
      ),
    );
  }
}
utilsと同じようにviews.dartにexport文を記述します。
export 'home.dart';アプリ起動時にHomeViewが表示されるようにmain.dartを修正します。
import 'package:flutter/material.dart';
import 'package:sample_location_app/import.dart';

void main() {
  runApp(const MyApp());
}

class MyApp extends StatelessWidget {
  const MyApp({super.key});

  @override
  Widget build(BuildContext context) {
    const String title = 'Flutter location Demo';

    return MaterialApp(
      title: title,
      theme: ThemeData(
        colorScheme: ColorScheme.fromSeed(seedColor: Colors.deepPurple),
        useMaterial3: true,
      ),
      home: const HomeView(title: title),
    );
  }
}
以上でソースコードのコーディングは完了です。
OS設定ファイルの修正
locationパッケージとpermission_handelerパッケージを利用するにはいくつかOS設定ファイルの修正が必要になるので実施します。
Android
まずはlocationパッケージで求められているminSdkVersionを21に修正します。
~/android/app/build.gradleでminSdkVersionの指定が可能ですが、Flutterで作成されたプロジェクトで設定されている値はflutter.minSdkVersionが参照されます。
参照元の値は~/flutter/packages/flutter_tools/gradle/src/main/groovy/flutter.groovyで指定されています。
class FlutterExtension {
    /** Sets the compileSdkVersion used by default in Flutter app projects. */
    static int compileSdkVersion = 34

    /** Sets the minSdkVersion used by default in Flutter app projects. */
    static int minSdkVersion = 19 ★ 21以上へ修正

    /**
     * Sets the targetSdkVersion used by default in Flutter app projects.
     * targetSdkVersion should always be the latest available stable version.
     *
     * See https://developer.android.com/guide/topics/manifest/uses-sdk-element.
     */
    static int targetSdkVersion = 33

    /**
     * Sets the ndkVersion used by default in Flutter app projects.
     * Chosen as default version of the AGP version below as found in
     * https://developer.android.com/studio/projects/install-ndk#default-ndk-per-agp.
     */
    static String ndkVersion = "23.1.7779620"

    /**
     * Specifies the relative directory to the Flutter project directory.
     * In an app project, this is ../.. since the app's build.gradle is under android/app.
     */
    String source

    /** Allows to override the target file. Otherwise, the target is lib/main.dart. */
    String target
}
次はAndroidManifest.xmlにuses-permissionを追加します。
ファイルは~/android/app/src/main/に配置されています。
<manifest xmlns:android="http://schemas.android.com/apk/res/android">
    <!-- 追加 -->
    <uses-permission android:name="android.permission.FOREGROUND_SERVICE" />
    <uses-permission android:name="android.permission.ACCESS_BACKGROUND_LOCATION"/>
    <!-- ここまで -->

    <application android:label="sample_location_app" android:name="${applicationName}" android:icon="@mipmap/ic_launcher">
        <activity android:name=".MainActivity" android:exported="true" android:launchMode="singleTop" android:theme="@style/LaunchTheme" android:configChanges="orientation|keyboardHidden|keyboard|screenSize|smallestScreenSize|locale|layoutDirection|fontScale|screenLayout|density|uiMode" android:hardwareAccelerated="true" android:windowSoftInputMode="adjustResize">
            <meta-data android:name="io.flutter.embedding.android.NormalTheme" android:resource="@style/NormalTheme" />
            <intent-filter>
                <action android:name="android.intent.action.MAIN"/>
                <category android:name="android.intent.category.LAUNCHER"/>
            </intent-filter>
        </activity>

        <meta-data android:name="flutterEmbedding" android:value="2" />
    </application>

    <queries>
        <intent>
            <action android:name="android.intent.action.PROCESS_TEXT"/>
            <data android:mimeType="text/plain"/>
        </intent>
    </queries>
</manifest>
最後にkotolinのバージョンを変更します。
バージョンは~/android/settings.gradleで指定されています。
pluginManagement {
    def flutterSdkPath = {
        def properties = new Properties()
        file("local.properties").withInputStream { properties.load(it) }
        def flutterSdkPath = properties.getProperty("flutter.sdk")
        assert flutterSdkPath != null, "flutter.sdk not set in local.properties"
        return flutterSdkPath
    }
    settings.ext.flutterSdkPath = flutterSdkPath()

    includeBuild("${settings.ext.flutterSdkPath}/packages/flutter_tools/gradle")

    repositories {
        google()
        mavenCentral()
        gradlePluginPortal()
    }
}

plugins {
    id "dev.flutter.flutter-plugin-loader" version "1.0.0"
    id "com.android.application" version "7.3.0" apply false
    id "org.jetbrains.kotlin.android" version "1.7.10" apply false ★ 1.9.0以上へ修正
}

include ":app"
Androidの設定は以上になります。
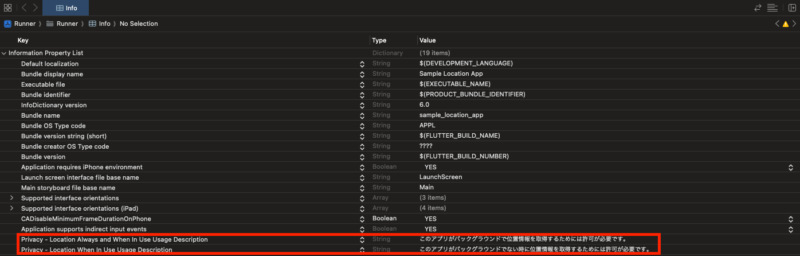
iOS
Xcodeからinfo.plistに設定を追加します。
続いてios/直下に配置されているPodfileを編集します。
# Uncomment this line to define a global platform for your project
# platform :ios, '12.0'

# CocoaPods analytics sends network stats synchronously affecting flutter build latency.
ENV['COCOAPODS_DISABLE_STATS'] = 'true'

project 'Runner', {
  'Debug' => :debug,
  'Profile' => :release,
  'Release' => :release,
}

def flutter_root
  generated_xcode_build_settings_path = File.expand_path(File.join('..', 'Flutter', 'Generated.xcconfig'), __FILE__)
  unless File.exist?(generated_xcode_build_settings_path)
    raise "#{generated_xcode_build_settings_path} must exist. If you're running pod install manually, make sure flutter pub get is executed first"
  end

  File.foreach(generated_xcode_build_settings_path) do |line|
    matches = line.match(/FLUTTER_ROOT\=(.*)/)
    return matches[1].strip if matches
  end
  raise "FLUTTER_ROOT not found in #{generated_xcode_build_settings_path}. Try deleting Generated.xcconfig, then run flutter pub get"
end

require File.expand_path(File.join('packages', 'flutter_tools', 'bin', 'podhelper'), flutter_root)

flutter_ios_podfile_setup

target 'Runner' do
  use_frameworks!
  use_modular_headers!

  flutter_install_all_ios_pods File.dirname(File.realpath(__FILE__))
  target 'RunnerTests' do
    inherit! :search_paths
  end
end

post_install do |installer|
  installer.pods_project.targets.each do |target|
    flutter_additional_ios_build_settings(target)
    # 追記
    target.build_configurations.each do |config|
      config.build_settings['GCC_PREPROCESSOR_DEFINITIONS'] ||= [
        '$(inherited)',
        'PERMISSION_LOCATION=1',
      ]
    end
    # ここまで
  end
end
iOSの設定は以上です。
エミュレータに位置情報を設定する
エミュレータに位置情報を設定してアプリの動作確認を行います。
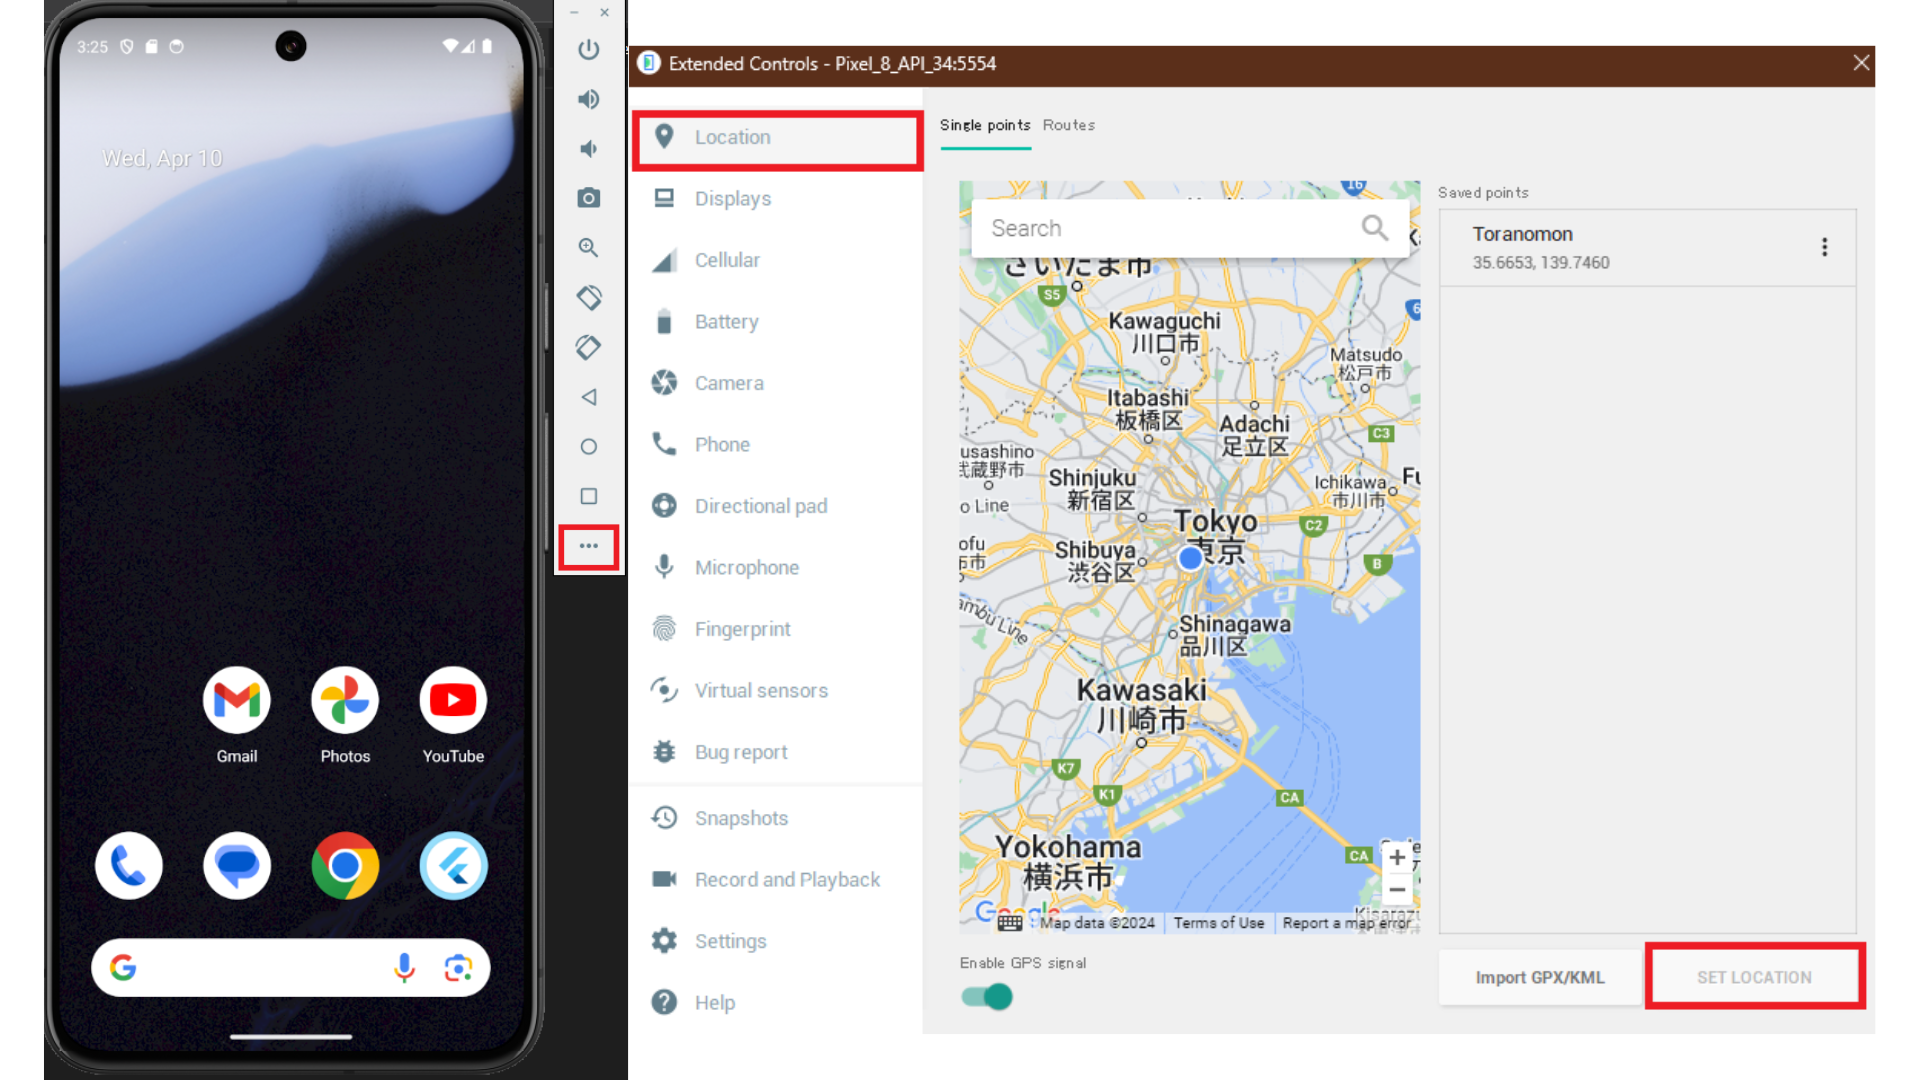
Android
エミュレータのExtended Controlsを開いてLocationより任意の位置情報を設定します。
iOS
Xcode上のDebug -> Simulate Locationから設定できます。
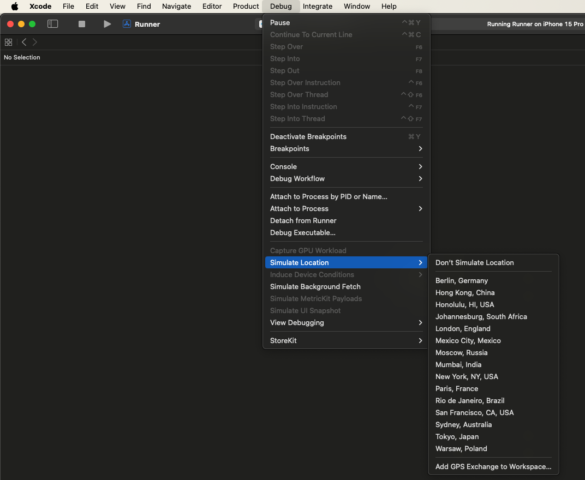
設定は以上になります。これでアプリから位置情報が取得できるようになりました。
一定間隔で位置情報を取得する
getボタンを押下後に一定間隔で位置情報を取得し続ける処理に変更してみます。
繰り返し処理にはTimerクラスを使用します。
import 'dart:async';

import 'package:flutter/material.dart';
import 'package:location/location.dart';
import 'package:sample_location_app/import.dart';

class HomeView extends StatefulWidget {
  const HomeView({super.key, required this.title});

  final String title;

  @override
  State<HomeView> createState() => _HomeViewState();
}

class _HomeViewState extends State<HomeView> {
  LocationData? _currentLocation;
  Timer? _timer;
  final location = Location();

  void _requestLocationPermission() async {
    await RequestLocationPermission.request(location);
  }

  // _getLocationの処理を変更
  void _getLocation() {
    _timer = Timer.periodic(const Duration(seconds: 10), (_) async {
      final currentLocation = await GetLocation.getPosition(location);
      setState(() => _currentLocation = currentLocation);
    });
  }

  @override
  Widget build(BuildContext context) {
    return Scaffold(
      appBar: AppBar(
        backgroundColor: Theme.of(context).colorScheme.inversePrimary,
        title: Text(widget.title),
        centerTitle: true,
      ),
      body: Center(
        child: Column(
          mainAxisAlignment: MainAxisAlignment.center,
          children: <Widget>[
            Padding(
              padding: const EdgeInsets.all(10),
              child: Text(
                '$_currentLocation',
                style: Theme.of(context).textTheme.bodyLarge,
              ),
            ),
            ButtonBar(
              alignment: MainAxisAlignment.center,
              buttonPadding: const EdgeInsets.all(10),
              children: [
                SizedBox(
                  height: 50,
                  width: 105,
                  child: ElevatedButton(
                    onPressed: _requestLocationPermission,
                    child: const Text('request'),
                  ),
                ),
                SizedBox(
                  height: 50,
                  width: 105,
                  child: ElevatedButton(
                    onPressed: _getLocation,
                    child: const Text('get'),
                  ),
                ),
                // 繰り返し処理を停止させるcancelボタンを追加
                SizedBox(
                  height: 50,
                  width: 105,
                  child: ElevatedButton(
                    onPressed: _timer?.cancel,
                    child: const Text('cancel'),
                  ),
                ),
              ],
            ),
          ],
        ),
      ),
    );
  }
}
AndroidはExtended Controls -> Location -> Routesから経路を設定することで、端末の位置情報が移動し続けます。
iOSはgpxファイルを作成してXcode上のDebug -> Simulate Locationからファイルを追加することで同様のことが可能です。gpxファイルは下記から作成できます。

実際に動かしてみると一定間隔で位置情報が取得されて画面が再描画されているのがわかります。

flutter: Date:2024-04-16 11:51:55.510195
Location:LocationData<lat: 35.6713759715783, long: 139.75140506486568>
flutter: Date:2024-04-16 11:52:05.506282
Location:LocationData<lat: 35.67172181029305, long: 139.7520150184226>
flutter: Date:2024-04-16 11:52:15.510715
Location:LocationData<lat: 35.67206963497639, long: 139.75262350978932>
おわりに
locationパッケージを使用して簡単にスマホの位置情報を取得することができました。
私の記事が少しでも皆様のご参考になれば幸いです!
